如何在生产环境中不停机升级 nginx、或者不停机引入 nginx 第三方模块
前言
在引入第三方模块pagespeed 的时候,查阅了官网发现,引入第三方需要重新安装升级,还有就是通过 yum install 加载进去。
不过试了一下,发现不能,最后才定位到。首先你得配置了 configure arguments。里面有你配置的模块才行,不然还是得重新安装一个。
1
[root@localhost ~]# nginx -V
-V 打印 nginx 版本,编译器版本和配置参数。 输出如下
1
configure arguments: --prefix=/usr/share/nginx --sbin-path=/usr/sbin/nginx --modules-path=/usr/lib64/nginx/modules --conf-path=/etc/nginx/nginx.conf --error-log-path=/var/log/nginx/error.log --http-log-path=/var/log/nginx/access.log --http-client-body-temp-path=/var/lib/nginx/tmp/client_body --http-proxy-temp-path=/var/lib/nginx/tmp/proxy --http-fastcgi-temp-path=/var/lib/nginx/tmp/fastcgi --http-uwsgi-temp-path=/var/lib/nginx/tmp/uwsgi --http-scgi-temp-path=/var/lib/nginx/tmp/scgi --pid-path=/run/nginx.pid --lock-path=/run/lock/subsys/nginx --user=nginx --group=nginx --with-file-aio --with-ipv6 --with-http_ssl_module --with-http_v2_module --with-http_realip_module --with-stream_ssl_preread_module --with-http_addition_module --with-http_xslt_module=dynamic --with-http_image_filter_module=dynamic --with-http_sub_module --with-http_dav_module --with-http_flv_module --with-http_mp4_module --with-http_gunzip_module --with-http_gzip_static_module --with-http_random_index_module --with-http_secure_link_module --with-http_degradation_module --with-http_slice_module --with-http_stub_status_module --with-http_perl_module=dynamic --with-http_auth_request_module --with-mail=dynamic --with-mail_ssl_module --with-pcre --with-pcre-jit --with-stream=dynamic --with-stream_ssl_module --with-google_perftools_module --with-debug --with-cc-opt='-O2 -g -pipe -Wall -Wp,-D_FORTIFY_SOURCE=2 -fexceptions -fstack-protector-strong --param=ssp-buffer-size=4 -grecord-gcc-switches -specs=/usr/lib/rpm/redhat/redhat-hardened-cc1 -m64 -mtune=generic' --with-ld-opt='-Wl,-z,relro -specs=/usr/lib/rpm/redhat/redhat-hardened-ld -Wl,-E'
正文
先看看当前的版本

当前的版本为 nginx version: nginx/1.16.1
下载一个最新版本
1
[root@localhost ~]# wget http://nginx.org/download/nginx-1.19.4.tar.gz
解压同时进去
1
2
[root@localhost ~]# tar -vxf nginx-1.19.4.tar.gz
[root@localhost ~]# cd nginx-1.19.4
里面有个 configure 可执行文件。
要保证之前的版本和现在下载的配置一致。所以将 nginx -V 输出的东西复制一下,除了configure arguments: 不用复制。
在这一步就可以导入第三方的模块,比如现在导入第三方模块叫 pagespeed,最后面加个 –add-module=/usr/local/pagespeed-ngx
1
[root@localhost nginx-1.19.4]# ./configure --prefix=/usr/share/nginx --sbin-path=/usr/sbin/nginx --modules-path=/usr/lib64/nginx/modules --conf-path=/etc/nginx/nginx.conf --error-log-path=/var/log/nginx/error.log --http-log-path=/var/log/nginx/access.log --http-client-body-temp-path=/var/lib/nginx/tmp/client_body --http-proxy-temp-path=/var/lib/nginx/tmp/proxy --http-fastcgi-temp-path=/var/lib/nginx/tmp/fastcgi --http-uwsgi-temp-path=/var/lib/nginx/tmp/uwsgi --http-scgi-temp-path=/var/lib/nginx/tmp/scgi --pid-path=/run/nginx.pid --lock-path=/run/lock/subsys/nginx --user=nginx --group=nginx --with-file-aio --with-ipv6 --with-http_ssl_module --with-http_v2_module --with-http_realip_module --with-stream_ssl_preread_module --with-http_addition_module --with-http_xslt_module=dynamic --with-http_image_filter_module=dynamic --with-http_sub_module --with-http_dav_module --with-http_flv_module --with-http_mp4_module --with-http_gunzip_module --with-http_gzip_static_module --with-http_random_index_module --with-http_secure_link_module --with-http_degradation_module --with-http_slice_module --with-http_stub_status_module --with-http_perl_module=dynamic --with-http_auth_request_module --with-mail=dynamic --with-mail_ssl_module --with-pcre --with-pcre-jit --with-stream=dynamic --with-stream_ssl_module --with-google_perftools_module --with-debug --with-cc-opt='-O2 -g -pipe -Wall -Wp,-D_FORTIFY_SOURCE=2 -fexceptions -fstack-protector-strong --param=ssp-buffer-size=4 -grecord-gcc-switches -specs=/usr/lib/rpm/redhat/redhat-hardened-cc1 -m64 -mtune=generic' --with-ld-opt='-Wl,-z,relro -specs=/usr/lib/rpm/redhat/redhat-hardened-ld -Wl,-E' --add-module=/usr/local/pagespeed-ngx
你之前的 gcc 编译器可能版本比较低,可能出现 ./configure: error: C compiler cc is not found 的错误。 执行。
1
[root@localhost nginx-1.19.4]# yum -y install gcc-c++
之后如果还有 error 的错误,大概是模块不存在,你可以通过 yum install 下载你需要的依赖。
出现
1
2
3
4
5
6
7
8
9
10
11
12
13
14
15
16
17
18
19
20
21
creating objs/Makefile

Configuration summary
  + using system PCRE library
  + using system OpenSSL library
  + using system zlib library

  nginx path prefix: "/usr/share/nginx"
  nginx binary file: "/usr/sbin/nginx"
  nginx modules path: "/usr/lib64/nginx/modules"
  nginx configuration prefix: "/etc/nginx"
  nginx configuration file: "/etc/nginx/nginx.conf"
  nginx pid file: "/run/nginx.pid"
  nginx error log file: "/var/log/nginx/error.log"
  nginx http access log file: "/var/log/nginx/access.log"
  nginx http client request body temporary files: "/var/lib/nginx/tmp/client_body"
  nginx http proxy temporary files: "/var/lib/nginx/tmp/proxy"
  nginx http fastcgi temporary files: "/var/lib/nginx/tmp/fastcgi"
  nginx http uwsgi temporary files: "/var/lib/nginx/tmp/uwsgi"
  nginx http scgi temporary files: "/var/lib/nginx/tmp/scgi"
这表示你安装成功。
然后在同个目录底下执行 make,不要执行 make install 。如果执行了会覆盖之前的文件。
1
2
[root@localhost nginx-1.19.4]# make
[root@localhost nginx-1.19.4]# cd objs/
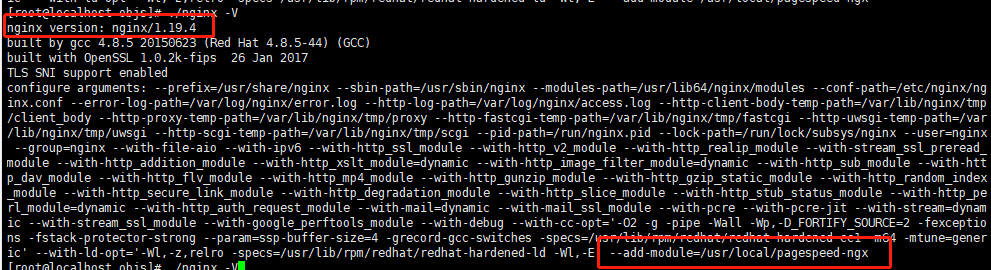
输入 ./nginx -V 查看版本是否是你安装的版本、以及第三方模块是否导入成功
1
[root@localhost objs]# ./nginx -V
结果输入如下:
由于是在生产环境升级部署。所以备份之前的版本很重要,如果是个人测试可以跳过这一步。
先找到你之前版本的二进制文件。
你可以 whereis nginx,也可以看 nginx -V 里面的 –sbin-path 路径。
1
2
3
4
5
6
7
8
# 二进制文件备份
[root@localhost objs]# cd /usr/sbin
[root@localhost sbin]# cp nginx nginx.20201117.old

# 配置文件备份
[root@localhost sbin]# cd /etc
[root@localhost nginx]# cp -r nginx nginx.20201117.old
现在可以替换了。
1
2
3
4
5
6
[root@localhost etc]# cd /root/nginx-1.19.4/objs/
[root@localhost objs]# rm -frv /usr/sbin/nginx
[root@localhost objs]# mv nginx /usr/sbin/
[root@localhost objs]# nginx -V
[root@localhost objs]# nginx -s reload
[root@localhost objs]# nginx -t
输出的版本对上,那么应该就没事问题了,然后重新加载 nginx,以及测试语法有没有错误。
1
2
nginx: the configuration file /tmp/to_remove/conf/nginx.conf syntax is ok
nginx: configuration file /tmp/to_remove/conf/nginx.conf test is successful
输出上图则表示升级成功。
不过这里有一个坑,那就是版本差距太大,会出现依赖版本冲突。我这边的做法是,遇到了这个,我则会执行 make install 覆盖之前的版本。然后在将备份的 nginx nginx.20201117.old 底下的 nginx.conf 文件,重新写入新的 nginx.conf 文件中。
做法如下:
1
2
[root@localhost ~]# cd /root/nginx-1.19.4
[root@localhost nginx-1.19.4]# make install
自此完成了 nginx 升级以及 nginx 第三方模块的引入。
可以继续使用
如果后续还想添加第三方依赖,或者修改 configure arguments:
1
2
[root@localhost ~]# cd /root/nginx-1.19.4
[root@localhost nginx-1.19.4]# make clean
然后,在重复之前的操作 ./configure、make 等命令,替换二进制的 nginx 文件。
声明
作者: Sinsy
本文链接:https://blog.sincehub.cn/2020/11/17/upgrade-nginx/
版权声明:本文为博主原创文章,遵循 CC 4.0 BY-SA 版权协议,转载请附上原文声明。
如您有任何商业合作或者授权方面的协商,请给我留言:550569627@qq.com